Theme editor

Scale Model Shop

SMER 1/48 Sukhoi su 22m4 in polish service

Thread owner
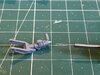
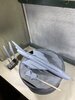
After a quick clean up and check the main parts of the airframe are ready for primer . Make up sponge has been cut and stuffed into various orifices ( oo er !) to stop overspray and some temporary legs have been made from sprue and a stirring stick . A light coat of Halfords grey primer and its now curing . While its drying ive been looking at the nose wheel and leg . Its got very weak locating pins ( one of them has already broken off) so im going to have to solve this later . The other thing is the location of the nose wheel . It is supposed to go in between the two halves of the leg but the locating pins are very small and not very positive - it just looks loose and wonky! . On top of this putting the nosewheel in now will cause problems painting later so I decided to drill out the pins and put a sleeve in the nosewheel so I can add it last off using a brass tube axle8B9B0269-C41E-4F91-9C79-3D82E4FEF1D5.jpeg95506AB2-E31B-4DE5-8232-951E653D2765.jpeg9B6415E5-B2D7-4F2F-AA36-84CBF3958346.jpeg5AD90FA4-3A90-4094-AAD6-376F3CD3B179.jpeg60E2AA67-725A-415B-9E17-F5926BE9FB73.jpegBDD02044-6754-429A-8BA3-F028722A10AF.jpeg8F84027D-77D7-418C-9995-B08FA7A29963.jpeg4AB67CE5-1308-4480-A9B8-0A7FE5D1F413.jpegFE44EEA1-F1E1-479D-892E-E3CF5CE6806C.jpeg
 
Hi Tony
Looking good with the primer. Aircraft undercarriage on models is often weak so good call sorting it now.
Jim
 
Looks good Tony. Did you spray the primer from the rattle can, or decant it?
Pete
 
Thread owner
Looks good Tony. Did you spray the primer from the rattle can, or decant it?
Pete
I always just shoot it straight from the can pete. It goes on great but its not something I would do in the house ! Its fine in the shed with the extractor going but as you can probably see they produce quite a bit of overspray but the filter catches most of it .
 
Thanks Tony. I don't worry so much about overspray as about getting a good finish. I've never had much luck with rattle cans.
Pete
 
Thread owner
Thanks Tony. I don't worry so much about overspray as about getting a good finish. I've never had much luck with rattle cans.
Pete
Give it a try pete , i love the stuff ! It always gives a hard uniform finish and, as long as you dont flood it , doesnt smother any detail . Its £7.49 for a big 500 ml can . Some people will say use the special plastic primer , its a similar price for a smaller 300 ml can , - you dont need to ,ive only ever used the bog standard stuff and its always been perfect .
 
Hi Tony
I'm (very) late to the party but just caught up with this. Some fine work sir! Love the cockpit, the detail in the exhaust, wheels. It was a shame about the seat but I think you saved the build magnificently.
Cracking build and log (as always) with some helpful tips along the way.
Great stuff
Paul
 
Thread owner
Got the first thin coat of all over light grey on today ( hataka light ghost grey fs 36375) . I’ll have a look when it's dry and see if anything needs attention then its going to get another one . After this it's mask up time and the darker grey . View attachment 442517
 

Attachments

  • A9AA8562-26B4-410C-AEAE-7228C7C568D2.jpeg
    A9AA8562-26B4-410C-AEAE-7228C7C568D2.jpeg
    3.2 KB · Views: 0
Give it a try pete , i love the stuff ! It always gives a hard uniform finish and, as long as you dont flood it , doesnt smother any detail . Its £7.49 for a big 500 ml can . Some people will say use the special plastic primer , its a similar price for a smaller 300 ml can , - you dont need to ,ive only ever used the bog standard stuff and its always been perfect .
Couldn't agree more Tony !
I've used the Halfords stuff straight from the can for absolutely years :)
As you say, you get more for your hard earned and a nice smooth,tough finish ;).
Excellent looking plane by the way!!
Andy
 
Thread owner
In between doing bits on the sea hurricane ive been looking at the broken nosewheel leg. The original fixing was weak to say the least and one of the lugs on the top of the leg came off while i was gluing the two halves together! These two lugs are the main fixing points for the leg , an angled retraction strut being the other . Considering all the lead ive put in the nose to stop tail sitting ,the nose leg needs to be a strong fixing . I drilled the remaining lug and inserted a brass rod , then fitted a brass tube over this to make a replacement lug . On its own this is still not strong enough so I drilled the leg and fitted a brass rod which will go into a hole drilled in the rear wall of the u/ c bay , hopefully this will give it a bit more strength . View attachment 444171View attachment 444172View attachment 444173View attachment 444174View attachment 444175
 

Attachments

  • 0C7AE514-AFB5-4ADA-8938-0E675B0553E2.jpeg
    0C7AE514-AFB5-4ADA-8938-0E675B0553E2.jpeg
    3.3 KB · Views: 0
  • DEAC0931-D1D4-481E-B773-AFA5F7C9C20A.jpeg
    DEAC0931-D1D4-481E-B773-AFA5F7C9C20A.jpeg
    3.2 KB · Views: 0
  • 7201EB64-699A-4CCE-941F-231804E8D188.jpeg
    7201EB64-699A-4CCE-941F-231804E8D188.jpeg
    3 KB · Views: 0
  • 52E0E44B-37B1-4E01-A7B6-E6BD8668BBF2.jpeg
    52E0E44B-37B1-4E01-A7B6-E6BD8668BBF2.jpeg
    3.7 KB · Views: 0
  • 662F9D9E-4A64-4709-ADFC-648433B350B2.jpeg
    662F9D9E-4A64-4709-ADFC-648433B350B2.jpeg
    3.3 KB · Views: 0
Hi Tony
Nose wheel fix look good. Well worth the effort and a neat solution.
Jim
 
Looking really good Tony. The strengthening of the undercarriage looks very well done and I’m sure will make all the difference.
Quality stuff
Paul
 
Thread owner
Hi Tony
Nose wheel fix look good. Well worth the effort and a neat solution.
Jim
Hi Tony
Nose wheel fix look good. Well worth the effort and a neat solution.
Jim
Thanks guys but Ive just realised - schoolboy error ! The strengthening rod to go into the undercarriage well is facing the wrong way ! DOH! Hopefully the superglue hasnt got too strong a grip .
 
Just caught up Tony, some very nice work going on, but come on what kind of error is that. I think I'm going to stop following you now.
Keep up the great work mate.
 
You just can't get the staff these days!

Looking good though Tony.

Pete
 
Thread owner
Well this ones been at a standstill for a couple of reasons . 1- not enough time 2. Been waiting for some decals .
Yes I know ive already got some but after looking at the shape of the numbers in the generic sets I wasn't happy so bought some specific decals for the grey polish scheme. I was also struggling to find a decent plan view for the camo . So they arrived yesterday , and I literally shivered when I opened them —D47A04B5-44ED-41BE-BC08-86AC829688A7.jpeg792FD836-3DD2-487C-95A3-2ECA18BD2B09.jpeg
Yes , nearly 400 of them , about 380 of which are tiny stencils ! If i reckon on about 60 an hour including soaking it’ll only take about seven hours if im quick:tired::smiling5:
 
Good luck Tony. I reckon you'll be going some to get 60 an hour. At my rate I expect it would be full time for a week!

Nick
 
Thread owner
Masked up today , white tack sausages and tape . The darker grey went on no problems and its now been unmasked . Ive been looking at the stores too , the drop tanks have been painted light ghost grey and the rocket pods silver. The KKR-1 reconnaissance pod was a bit scant on the details ( partly the kit , partly my over enthusiastic sanding !) so ive been adding a few bits of plastic strip and card to represent the sensor covers . Next job painting the exhaust area and gun blast shields in silver .47FC449B-E474-44DA-97D4-A17F26212E42.jpeg97E3E2B3-7A27-4447-9A25-E98A9027A5EF.jpeg432BF2C1-055B-40E7-AF2F-0D14D1D72C01.jpeg5FFDE1D1-F8DE-437C-8128-FCFF711750CA.jpeg858B5376-8B34-4563-8565-69D539EB789A.jpeg
 
Back
Top